Making Doll Clothes – #3 Easy Dolly Bib
We are going to use the concept of the “sandwich” from Making Doll Clothes #2 to make a bib to match or our dolly burp cloth.

Step 1 – Measure the width of your doll’s chest between the shoulders like this.

Step 2 – Find an appealing shape template that is close to the size of your doll’s chest measurement. I have selected from these heart shapes. Print out the size that is closest to the measurement (or, you can print them all out and place them over your doll’s chest to see how they fit).

Step 3 – Cut out the printed shape from the template and use it to cut your two coordinating fabric pieces.

Step 4 – Place the heart pieces on your doll’s chest where you want the bib to stay and measure around the back of the doll’s neck.

Step 5 – Add one inch to your measurement and then cut a strip that is two inches wide by the length you discovered. (My measurement was about 8 inches, so I am going to cut my piece 9 inches by 2 inches.)

Step 6 – Fold the strip at the short ends 1/4 inch and press. Next, press 1/4 inch on the long ends. Fold the strip in half on the long side and sew close to the edge on all four sides of the strap.

Step 7 – Now Cut this strap in half so that you now have 2 finished straps.
Step 8 – Place and pin the two strap pieces at the top each side of one of the fabric heart pieces that is facing up. (See illustration below #9)
Step 9 – Place the other heart piece on top of the heart and straps facing down. (You have just “sandwiched” the straps between the heart pieces)
Step 10 – Pin and sew around the shape using a 1/4 inch seam and leaving about a 2 inch opening as shown in the last picture above.
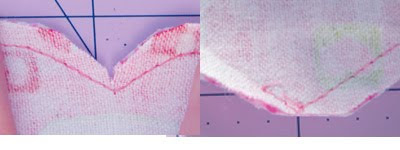
Step 11 – Clip the top of the heart in the center but not through the stitching.

Step 12 – Clip the bulk from the bottom of the heart to rid of extra bulk at the point. (See right picture above.)
Step 13 – Press the edges at the opening toward the center of the heart so that all the edges line up around the heart.
Step 14 – Turn the heart right side out and press. Stitch all the way around the heart about an 1/8 inch from the edge. This will sew the opening together.

Step 15 – Find a small piece of velcro and sew onto the ends of the straps to keep the bib on the doll.
Step 16 – Try the bib on your doll. Do you like it?
Now, find the burp cloth and give them to your little girl to feed and burp her doll. She will love them.
Once you learn the process of making these bibs, you can find and use a template for almost any shape. You could make matching bib and burp cloth sets for each season or holiday. The possibilities are endless.


